-
Calendar, Contacts, ActiveSync
- Android - sync calendar, contacts and email
- How to create a shared mailbox in SOGo webmail?
- How to import an address book in SOGo webmail?
- How to manage an address book in SOGo webmail?
- How to manage calendars in SOGo webmail?
- iPhone - sync calendar, contacts and email
- Mac mail (iOS) - sync calendar, contacts and email
- Outlook (iOS) - sync calendar, contacts and email
- Outlook (Windows) - sync calendar, contacts and email
- Thunderbird - sync calendar, contacts and email
-
Database
-
DNS
- Can I manage DNS for my domain?
- How can I disable automatic renewal of my subscription?
- How can I reactivate my inactivated subscription?
- How can I redeem my cancelled subscription?
- How can I revoke my cancellation request?
- How can I view/edit nameservers for domain?
- How do I cancel a service/domain?
- How to activate DNSSEC for your domain?
- How to add DNSSEC DS record?
- How to deactivate DNSSEC for your domain?
- How to export DNS/forwarders data?
- How to import DNS/forwarders data?
- How to manage the DNS zone for my domain?
- How to navigate to service’s main page?
- How to resolve issue with DNS?
- How to safely change DNS with DNSSEC activated?
- How to upgrade my service?
- What happens after my order?
- What happens if I don’t pay my subscription?
- What happens when system inactivates my subscription?
- What happens with my domain/service when I cancel my subscription?
- What is DNS?
- What is DNSSEC?
- What is Domain Account?
- What is domain/service subscription?
- What is multidomain service?
- Why am I receiving notifications about inactivation of my subscription?*
- Show Remaining Articles ( 12 ) Collapse Articles
-
Domains
- Can I change the name of my domain?
- Can I manage DNS for my domain?
- How can I disable automatic renewal of my subscription?
- How can I reactivate my inactivated subscription?
- How can I redeem my cancelled subscription?
- How can I revoke my cancellation request?
- How can I view/edit nameservers for domain?
- How do I cancel a service/domain?
- How to change ownership of a domain name?
- How to connect domain with service?
- How to export DNS/forwarders data?
- How to import DNS/forwarders data?
- How to manage the DNS zone for my domain?
- How to navigate to domain’s main page?
- How to reconnect domain with another service?
- How to renew my subscription for a longer period?
- How to resolve issue with DNS?
- How to switch from Premium to Cheap domain name?
- How to transfer a domain from Svenska Domäner to a different registrar?
- How to transfer your domain to us?
- How to update my customer information and registered domain information (Whois)?
- Parked (Alias) vs Additional domain (Website)
- The email address I have registered on my customer account is no longer valid, how do I update it?
- What happens after my order?
- What happens if I don’t pay my subscription?
- What happens when system inactivates my subscription?
- What happens with my domain/service when I cancel my subscription?
- What is domain/service subscription?
- What is the difference between Premium and Cheap domains?
- Why am I receiving notifications about inactivation of my subscription?*
- Why do I have different prices for my domains?
- Why has there been a lot of weird characters added to my domain name?
- Why is my domain still regarded as "Available" after I have placed my order?
- Show Remaining Articles ( 18 ) Collapse Articles
-
Economy
- 30-days money back guarantee
- Can I get a copy of invoice?
- Can I merge all my services in one invoice?
- How do I change from paper invoice to PDF invoice?
- How do I find my invoices?
- How do I pay an invoice?
- How do I register a new card for recurring payments?
- How do I remove my card?
- How to enable/disable safe crediting?
- How to navigate to invoice’s main page?
- How to set address invoice (paper invoice) is sent to?
- I have overpaid an invoice, how do I get the exceeding amount back?
- I have received invoice (paper invoice) from Svenska Domäner
- My invoices are sent to the wrong address, how do I change address?
- What address will my invoices be sent to?
- What is safe crediting?
- What is the difference between a paper invoice and a PDF invoice?
- What methods of payment do you accept?
- Why can´t I pay with Invoice?
- Why have I received a letter from Svenska Domäner Hosting AB?
- Why have I received notification about card expiration?
- Why have I recieved an invoice?
- Why I received notification about activation of safe crediting?
- Show Remaining Articles ( 8 ) Collapse Articles
-
Email
- General settings for e-mail
- How can I disable automatic renewal of my subscription?
- How can I reactivate my inactivated subscription?
- How can I redeem my cancelled subscription?
- How can I revoke my cancellation request?
- How do I add a signature to my emails (webmail)?
- How do I cancel a service/domain?
- How do I change password for an email address?
- How do I create an email account?
- How many emails I can send per hour?
- How to deal with SpamExperts Quarantine Reports?
- How to navigate to service’s main page?
- How to set out of office auto responder?
- How to upgrade my service?
- I cannot connect to my incoming or outgoing email server
- What happens after my order?
- What happens if I don’t pay my subscription?
- What happens when system inactivates my subscription?
- What happens with my domain/service when I cancel my subscription?
- What is domain/service subscription?
- What is multidomain service?
- What is the difference between "POP" and "IMAP"?
- Where can I read my e-mail?
- Why am I receiving notifications about inactivation of my subscription?*
- Why my email is not working?
- Why my IP is blocked for email service?
- Show Remaining Articles ( 11 ) Collapse Articles
-
Email set up guides
-
Forms
-
My Account
- Can I change the password for my account?
- How to navigate to domain’s main page?
- How to navigate to invoice’s main page?
- How to navigate to service’s main page?
- How to update my customer information and registered domain information (Whois)?
- How to upgrade my service?
- I have filled in the correct information, how come I still cannot log in to cPanel?
- I have forgotten my password?
- I'm not receiving any emails from you, why?
- The email address I have registered on my customer account is no longer valid, how do I update it?
- What is my contact address used for?
- Why should I upgrade to new services?
-
Security
-
SitePro Site builder
- How big should my background picture be when building with SitePro?
- How to add file (e.g. .pdf, .docx, .xlsx, .mp3, .gif, etc.) to the website with SitePro?
- How to add Google Analytics and Search Console (Webmaster Tools) with SitePro?
- How to add social buttons in SitePro?
- How to change background in SitePro?
- How to create e-commerce site with SitePro?
- How to insert Google Maps using SitePro?
- How to make my site responsive in SitePro?
- How to resize my image in SitePro?
- How to use SitePro site builder?
- Why can't I add a new items in Wide/Tablet/Mobile website versions of my SitePro site?
-
SSL-certificate
-
Terms of usage
-
Web hosting / Website
- E-Commerce (Electronic Commerce)
- How can I disable automatic renewal of my subscription?
- How can I reactivate my inactivated subscription?
- How can I redeem my cancelled subscription?
- How can I revoke my cancellation request?
- How do I cancel a service/domain?
- How to change PHP version?
- How to create an FTP account?
- How to install software using 1-Click Application tool?
- How to install Wordpress through 1-Click-Install?
- How to navigate to service’s main page?
- How to upgrade my service?
- I have updated my website, why are the changes not showing?
- What e-commerce to choose?
- What happens after my order?
- What happens if I don’t pay my subscription?
- What happens when system inactivates my subscription?
- What happens with my domain/service when I cancel my subscription?
- What is domain/service subscription?
- What is multidomain service?
- What is web hosting?
- When visiting my webpage, all I see is a file structure
- Why am I receiving notifications about inactivation of my subscription?*
- Why my website does not appear on the Web?
- Show Remaining Articles ( 9 ) Collapse Articles
-
Weebly Site builder
- How can I change my contact form email address in Weebly?
- How do I add a calendar to my site with Weebly?
- How do I add online-booking to my site?
- How do I add sections to my site?
- How do I add social buttons to my site with Weebly?
- How do I choose and change fonts with Weebly?
- How do I choose custom colors for a theme in Weebly?
- How do I create a Read more-link in Weebly?
- How do I create a site in multiple languages with Weebly?
- How do I customize my background i Weebly?
- How do I customize my website header in Weebly?
- How do I edit or delete a blog post in Weebly?
- How do I edit the footer in Weebly?
- How do I get started with the mobile app editor?
- How do I improve the site's search ranking with Weebly?
- How do I manage pages in Weebly?
- How do I move and adjust columns in Weebly?
- How do I navigate the Weebly editor, where do I find different tools?
- How do I publish my Weebly site?
- How do I save my work in Weebly?
- How do I set up a custom 404 page with Weebly?
- How do I start building my site with Weebly?
- How do I un-publish my site in Weebly?
- How do I undo a change in Weebly?
- How do I upload videos in HD with Weebly?
- How do I verify my Weebly site with search engines?
- How to add a color gradient background with Weebly?
- How to add a logo to your site with Weebly?
- How to add images to a site?
- How to add images to a site?
- How to add links to files and pages with Weebly?
- How to create a blog post with Weebly?
- How to create pages and navigation in Weebly?
- How to start a blog with Weebly?
- How to switch and manage themes in Weebly?
- How to use content elements in Weebly?
- How to use the audio player in Weebly?
- I have already installed the Weebly app, but can’t access my site, how do I log in?
- Why am I not receiving my contact form submissions with Weebly?
- Why can't I upload images or files in Weebly?
- Why can’t I see my site on the Weebly app?
- Show Remaining Articles ( 26 ) Collapse Articles
Thunderbird – sync calendar, contacts and email
Thunderbird mail client doesn’t support EAS (Exchange ActiveSync). That’s why you need to configure your mail using standard procedure:
– Guide for POP3
– Guide for IMAP
1. For contact synchronization, you need to set up a CardDav account using SOGo connector.
How to do it?
1. Download the SOGo connector from SOGo website: https://sogo.nu/.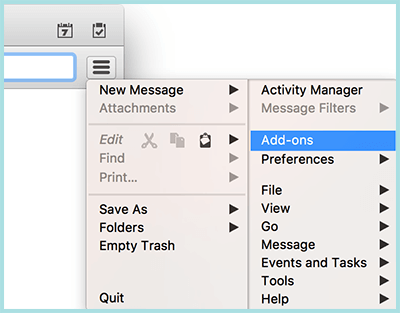
2. Open Thunderbird and go to:
– macOS: Tools -> Add-ons -> Extensions
– Windows: Tools -> Add-ons.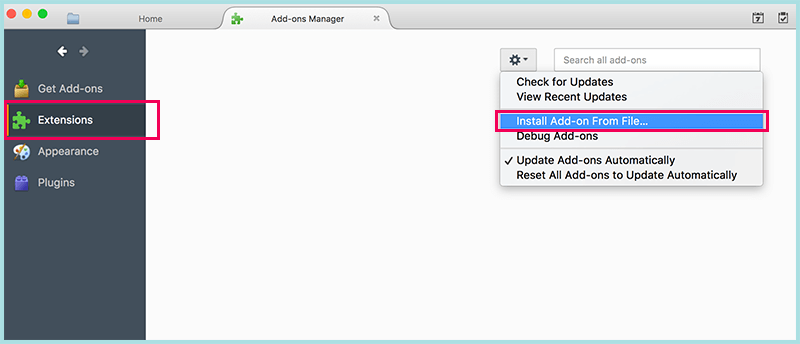
3. Click on the gear icon and choose “Install Add-on From File…”
4. Select the downloaded SOGo Connector xpi file to install it.
5. Restart Thunderbird.
6. Login to your mail account using SOGo: mail.svenskadomaner.se.
7. Click on “Address book” in the top right corner.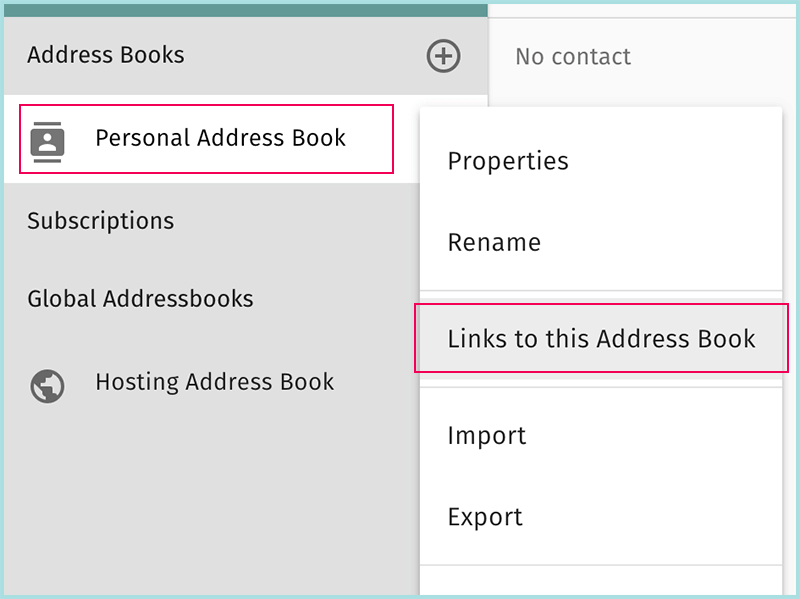
8. Choose the address book you want to sync (Personal Address Book is the default one), click on 3 vertical dots, choose “Link to this Address Book”.
9. Copy CardDAV URL.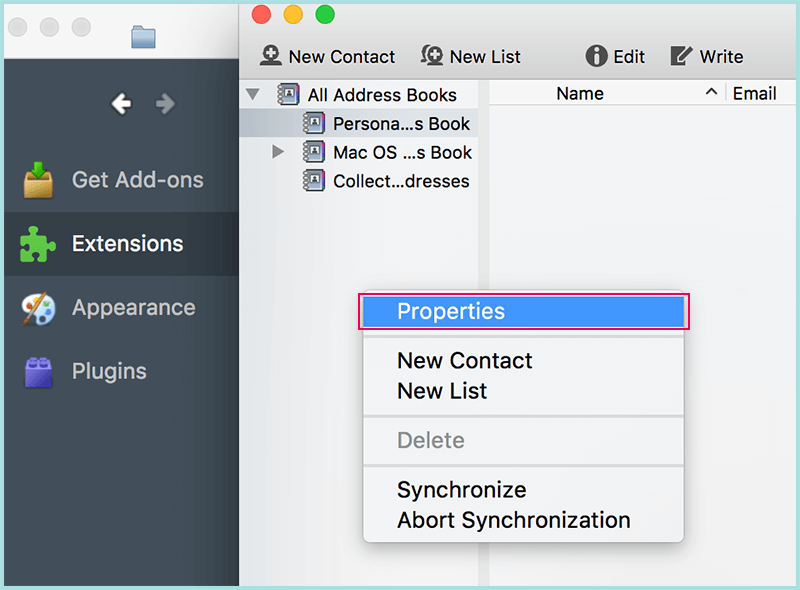
10. Launch Thunderbird and open Address book:
– macOS: menu Windows -> Address Book. Right-click in left sidebar and choose “Properties”.
– Window: menu File -> New -> Remote Address Book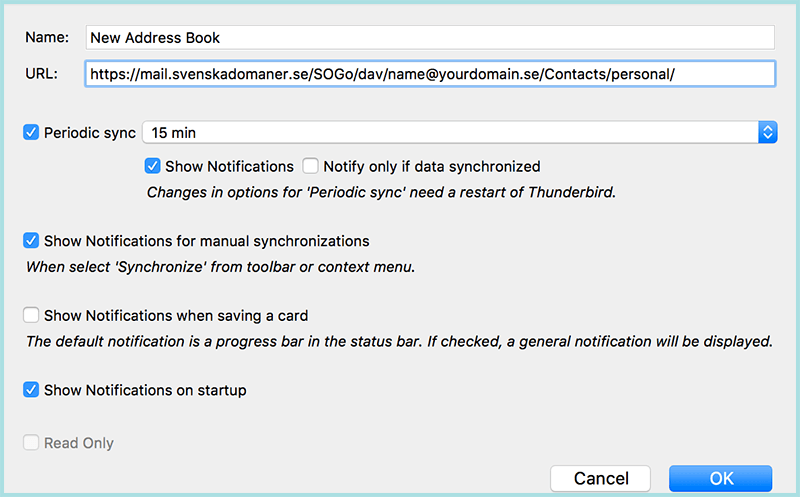
11. Fill in Name of the address book.
URL: paste the link that you copied in step 9.
Optionally check Periodic sync.
12. Click “ОК” button.
2. For calendar synchronization, you need to set up a CalDav account using Lightning – calendar add-on for Thunderbird.
How to do it?
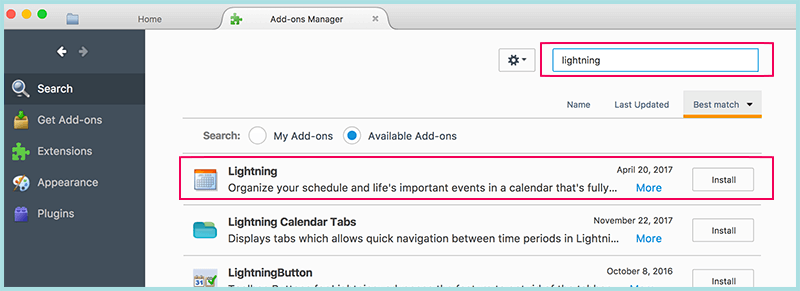
1. Open Thunderbird and go to Tools -> Add-ons. Search “Lightning” and install it.
2. Restart Thunderbird.
3. Login to your mail account using SOGo: mail.svenskadomaner.se.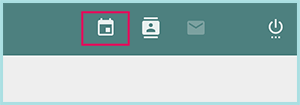
4. Click on “Calendar” in the top right corner.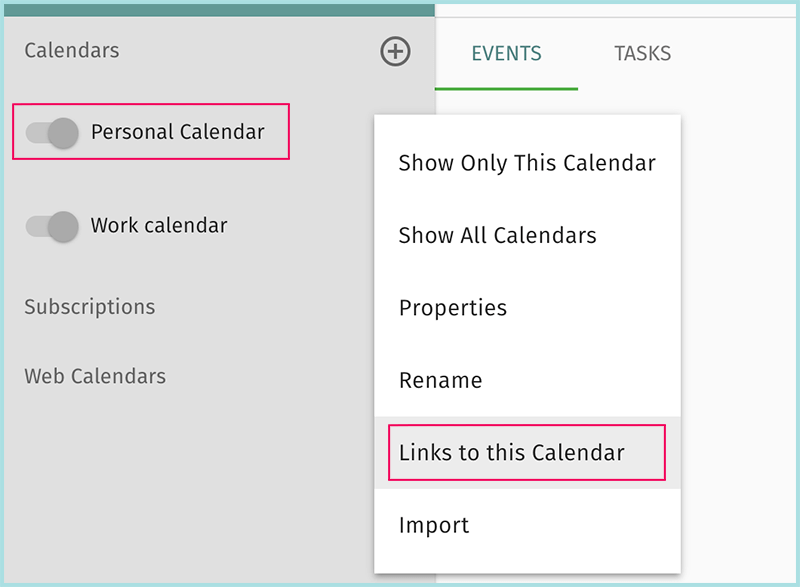
5. Choose the calendar you want to sync (Personal Calendar is the default one), click on 3 vertical dots, choose “Link to this Calendar”.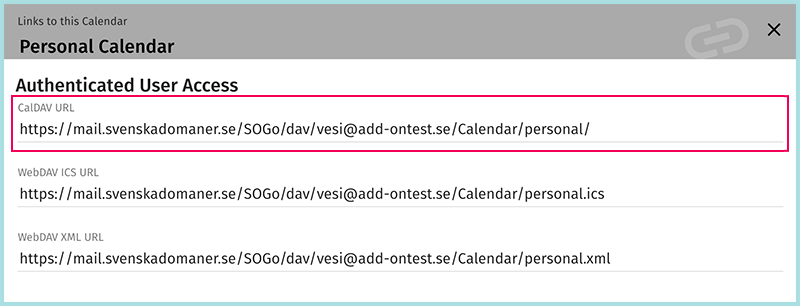
6. Copy CalDAV URL.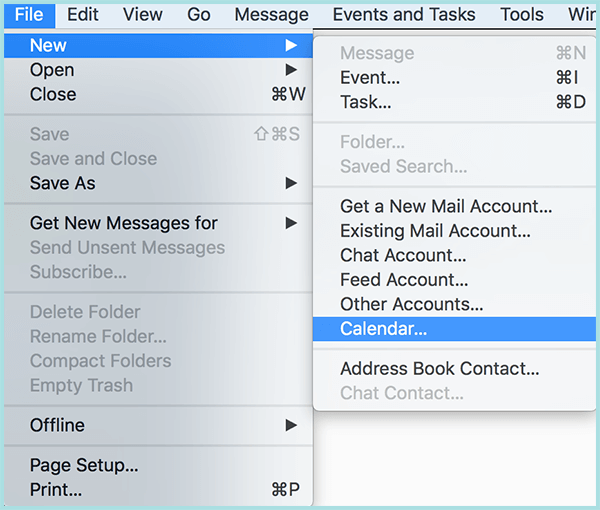
7. Launch Thunderbird and create a new calendar from menu File -> New -> Calendar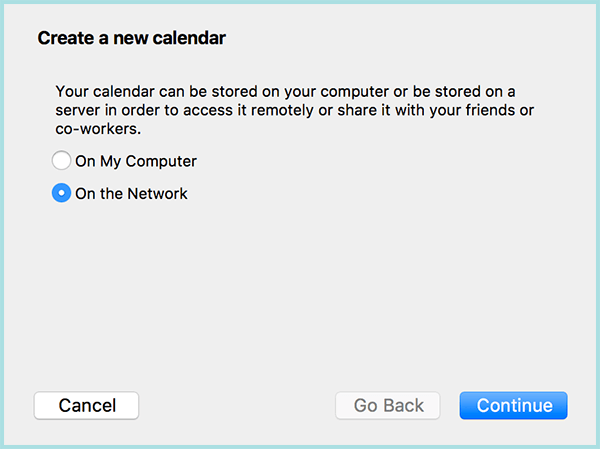
8. Choose “On the Network” option. Click “Continue”.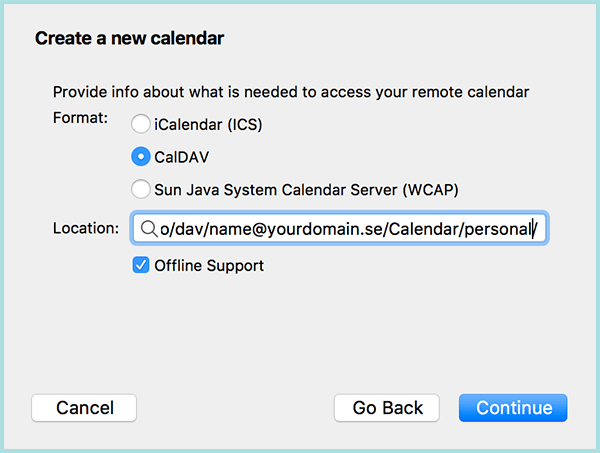
9. Click on the CalDav option and paste the link that you copied in step 6. Click “Continue”.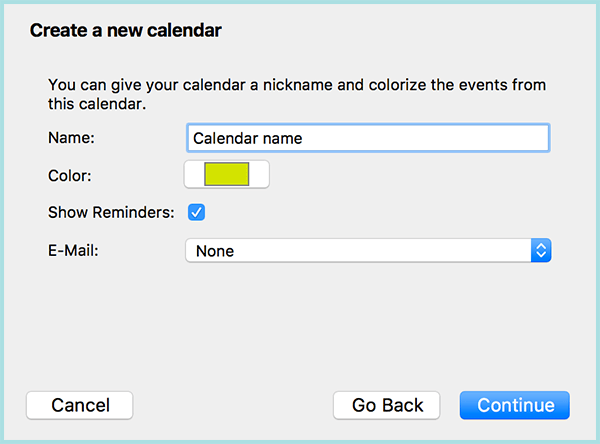
10. Type name for your calendar, optionally choose color, and click “Continue” button.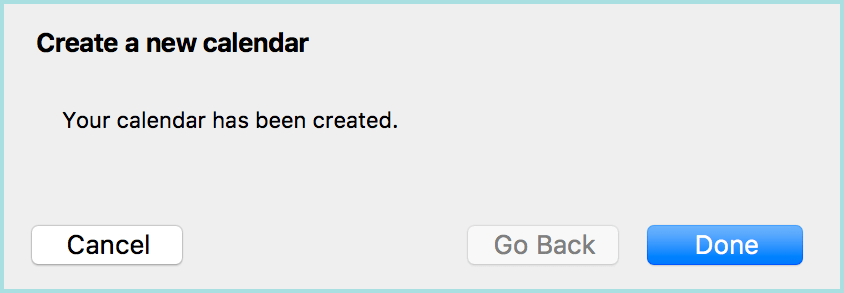
11. Your calendar is added.
